通过 Travis-CI 部署 Hexo Blog 到 Firebase Hosting - Google
Firebase Hosting Spark Plan提供 1GB 的免费托管,同时部署在高质量的 Goolge Cloud Platform 上的效果非常好,普通 Blog 都够用,以后需求超了也可以弹性调节 …
| 类型 | 套件 |
|---|---|
| Continuous Integration | Travis CI |
| BaaS | Firebase Hosting |
| Website | Hexo |
如果超过使用量可以升级到 #Blaze Plan => https://firebase.google.com/pricing
Google Proxy
欲论Google,代理先行,建议使用简单粗暴的方式直接上 Proxifier, 代理 node 这个程序的通信代理到你本地的HTTPS 代理上就行了
我从 log 里面看到在操作的过程中其实node会去request www.googleapis.com:443,所以你也可以单独代理这个地址还有 Google 全家桶的地址测试一下
Firebase Init
首先安装Firebase CLI
1 | $npm install -g firebase-tools |
登录firebase,此处开始会弹出一个网页,需要用代理登陆 Google 账号并授权
1 | $firebase login |
切换到你的Hexo项目的根目录,初始化firebase配置,选择Hosting
1 | $firebase init |
Firebase会生成一个firebase.json并进行配置hexo项目存放静态文件的public目录
1 | { |
部署到firebase成功后它会给到你访问的地址
1 | $firebase deploy |
Travis CI Integration
到 https://travis-ci.org/ 初始化账号 用github账号直接登陆,并在Hexo项目的根目录新建一个.travis.yml,内容参考如下:
1 | language: node_js |
Encrypt Github Token and Firebase CLI Token
因为你的 Github 已经对 Travis 进行授权,所以如果用 github public key 对字符串进行加密,Travis其实可以用 private key 对密文进行解密,但是因为其他人没有这个调用 private key 的权限,所以即便你在 .travis.yml 里面的密文放在 github 上让人看到也是安全的。
Github
到 https://github.com/settings/tokens 申请一个 Github access token,密文只会出现一次需要保存起来,授权上全选Repo就行了
加密并直接更新进 .travis.yml 的环境变量, GITHUB_TOKEN为引用的Key
1 | $travis encrypt -r [github user]/[github page project] "GITHUB_TOKEN=[github access token]" --add |
Firebase Token
运行一下代码获取firebase免交互的Login Token
1 | $firebase login:ci |
利用github的 public key 对 firebase token 进行加密,并添加到.travis.yml的 deploy.token.secure
1 | $travis encrypt -r [github user]/[github page project] [firebase token] --add deploy.token |
最终在 CI Pipleline 运行脚本的前需要把你在本地进行 Firebase login 后的 Session 进行 firebase logout
Travis Env Variables Setting
我使用直接在 travis-ci.org/[github user]/[github user repo]/settings设置环境变量的方法,就不用暴露在 Github 的.travis.yml里面,感觉似乎更安全, 而且这样就不需要进行加密了
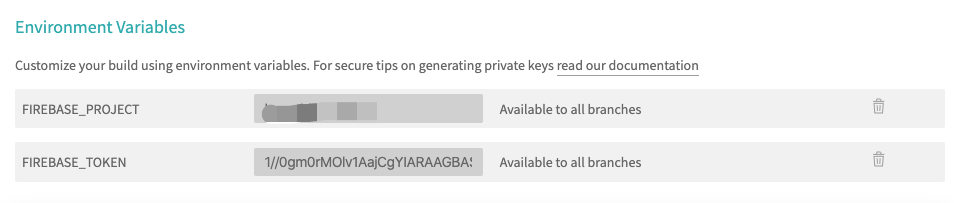
这种方式跟直接加在.travis.yml的区别就是在 run script 的时候环境变量的变量来源不同
- Setting environment variables from repository settings
- Setting environment variables from .travis.yml
1 | #Snippet of running script |
Travis-ci.org vs Travis-ci.com
Travis-ci.org 只能显示github 上 public 的项目,而Travis-ci.com 可以看到 private 的项目,有些收费计划那样, 不过我还是选择了 org, 暂时够用就好了
文章的设置是针对 travis-ci.org 的,而对于travis-ci.com,它的加密方式需要再参数上加--pro,加密前需用pro的账号登陆
1 | travis login --pro |
其他命令雷同,只是在参数上加上 --pro即可
Reference
travis ci for firebase
https://docs.travis-ci.com/user/deployment-v2/providers/firebase/
guideline
https://blog.erguotou.me/hexo-on-firebase.html
travis with js
https://github.com/dwyl/learn-travis
Travis-CI加密变量
https://blog.ahao.moe/posts/Travis_CI_Encrypting_keys.html
Travis CI
https://docs.travis-ci.com/user/environment-variables/